

How To Change Font Color And Size For Seach Footer Widget
 With more than than 200,000 active installations, the Storefront theme is designed, developed, and maintained by WooCommerce Core developers. It is therefore dubbed as the official WooCommerce theme.
This theme is designed to exist flexible every bit WooCommerce. The latest version has more than 40 action hooks and more than than threescore filter hooks.
WooCommerce Storefront CSS
However, the main question is how you can tweak the expect and layout of your theme. If yous are an experienced WordPress user, this will not be an outcome. Users who do not desire to get their hands dirty with CSS and PHP find it hard to customize the theme. For this tutorial, yous need to have some coding skills. Nosotros will add the CSS rules in the Additional CSS section via the customizer.
The advantage of using this section is that the WordPress customizer allows you to edit in a real-time fashion. You tin can run into the changes yous make before y'all tin can publish your changes.
It is as well worth mentioning that the Storefront theme needs to be the agile theme when customizing it.
In this mail, I will provide you with the ultimate guide of making CSS customization in the Storefront theme. The trick is identifying the chemical element that y'all demand to modify and adding a rule to that element.
With that said, here are some of the CSS rules you can use for the storefront theme.
1. Customize Header Size
Here nosotros will use the Theme Customizer again, but we volition write some CSS lawmaking in the 'Additional CSS' section.
Add together the post-obit code:
* Masthead */ #masthead.site-header { meridian: 155px!of import; margin-bottom:0px } /* Mobile CSS for Masthead */ @media only screen and (max-width: 320px) { #masthead.site-header { summit: 80px!important; margin-bottom:0px; } } /* Masthead card */ .storefront-primary-navigation a, .cart-contents a { margin:0 0 0 0; } .main-navigation ul { padding:0 0 10px 4px!important; } .main-navigation li { height:38px!of import;} /* Mobile CSS for Masthead carte */ @media only screen and (max-width: 320px) { .main-navigation ul { background:#D6DDE4!important; } } /* Header area */ .site-header { padding-peak:0.5em; } .site-header .custom-logo-link img, .site-header .site-logo-anchor img, .site-header .site-logo-link img { margin-lesser: -45px; } Here is the result: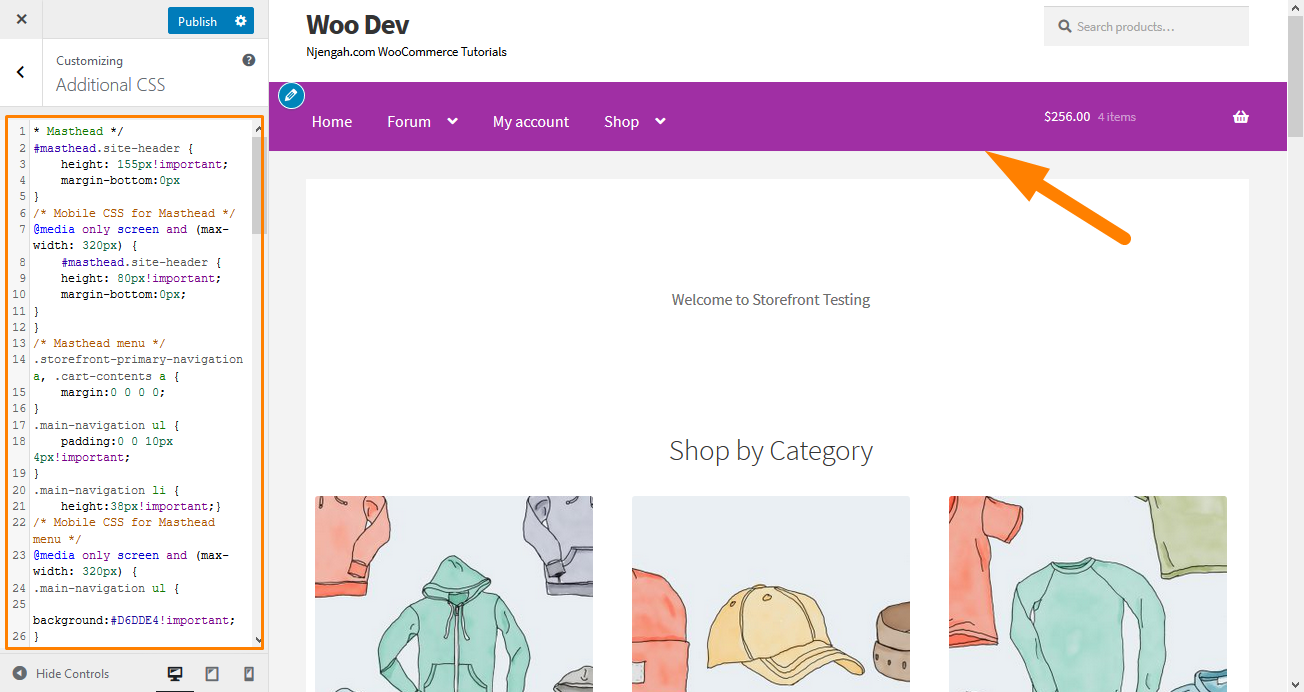
ii. Remove the Search Bar from the Theme'southward Header
Add this code to the 'Additional CSS' section.
.site-header .widget_product_search { display: none; } Here is the consequence: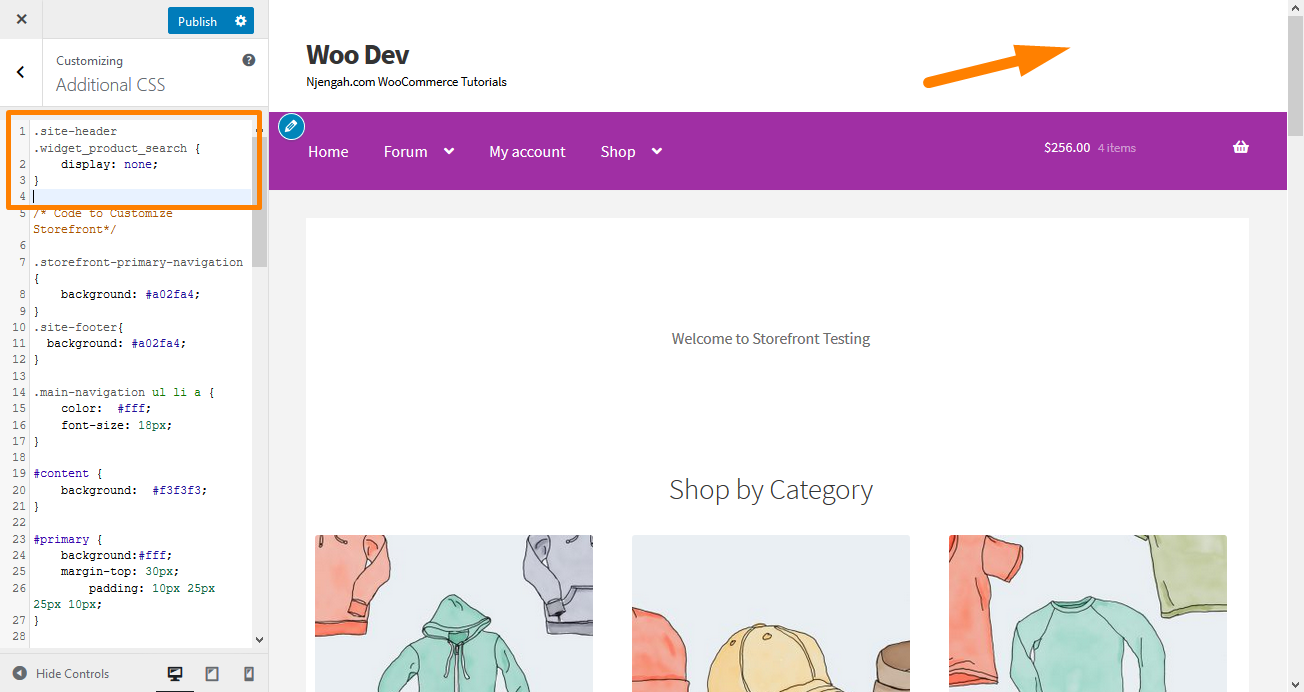
3. Change the Header Menu Color
The customizer allows the states to customize the header with the colors that you want. Yous tin practise this past navigating to Customize, then header, and picking the color you want.
All the same, this pick colors the unabridged header region, including the search bar, login section, and the logo. To become a different groundwork to the header menu, add the following code snippet to the Additional CSS console.
.storefront-chief-navigation, .main-navigation ul.menu ul.sub-menu{ groundwork-colour: light-green; } Here is the effect: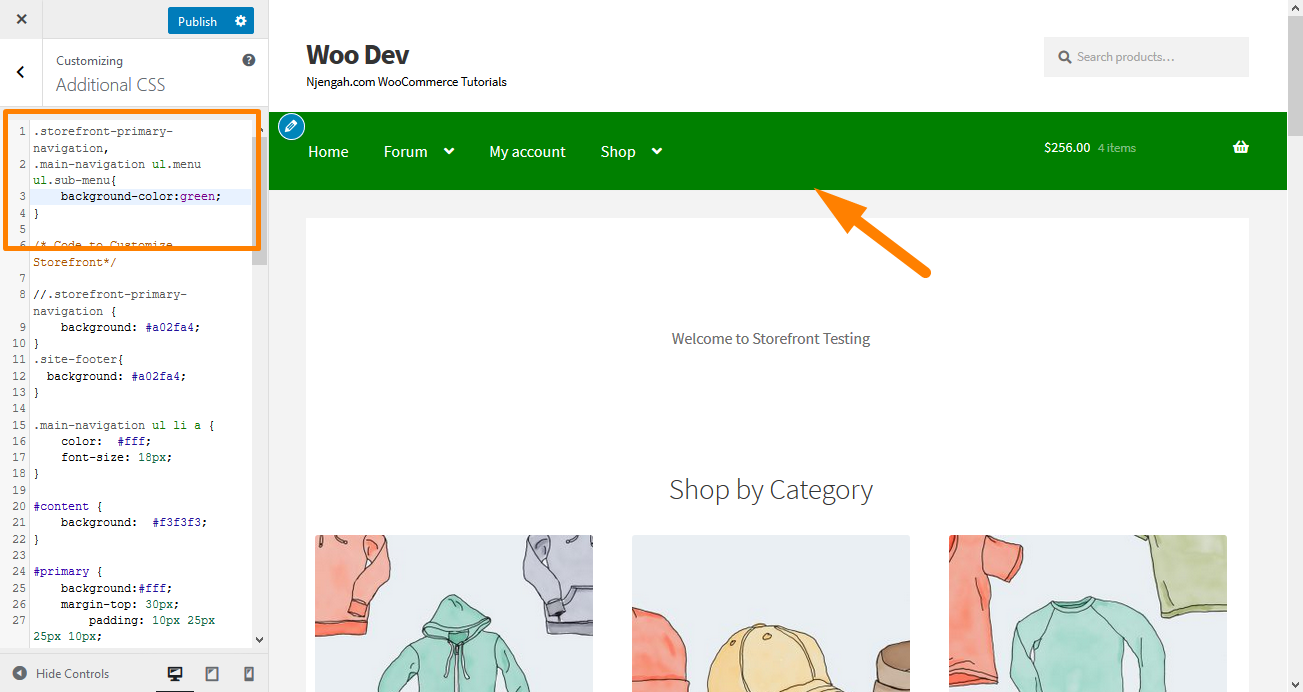
4. Hide the Chief Navigation Bar
Storefront Theme, by default, displays all the pages as a carte du jour. If you want to hibernate the primary navigation bar, deleting the carte is non enough. Navigate to Customize, then Additional CSS section, and add the following lines:
.storefront-master-navigation { display: none; } Here is the effect: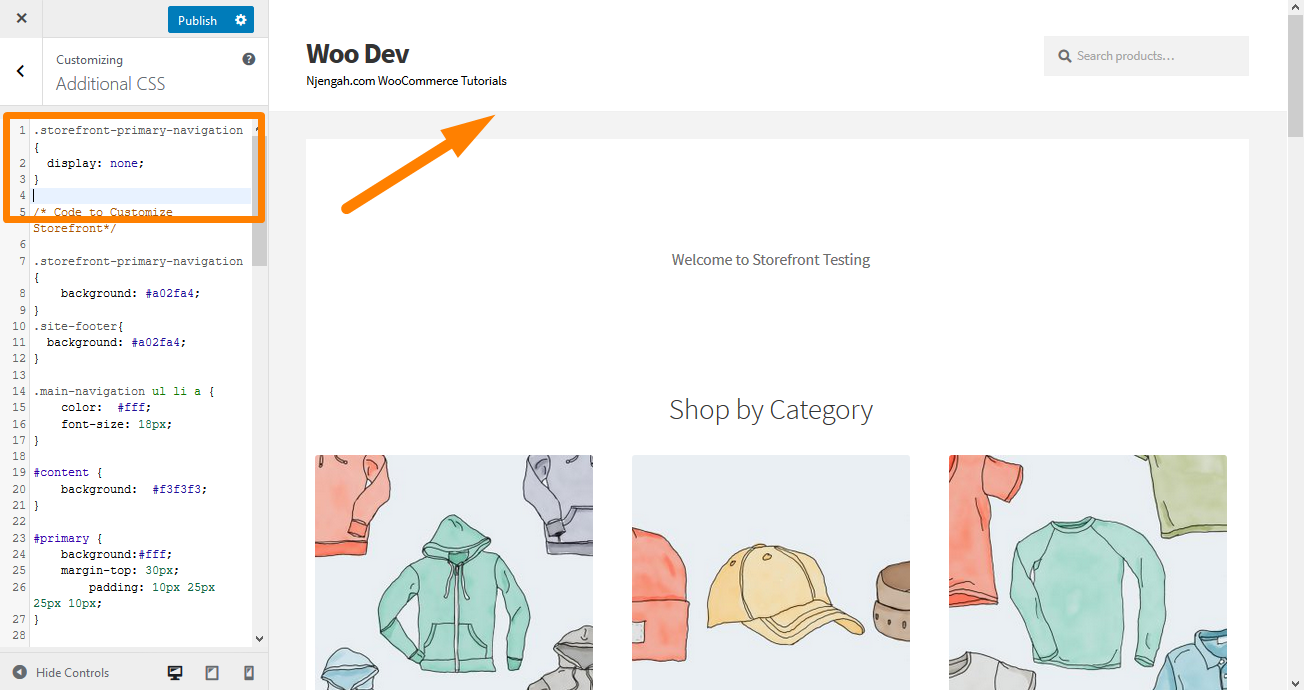
5. Remove Blank Space from the Header
Navigate to Customize, then Additional CSS section, and add the post-obit lines:
.site-branding { margin-bottom: 0px; } Hither is the issue: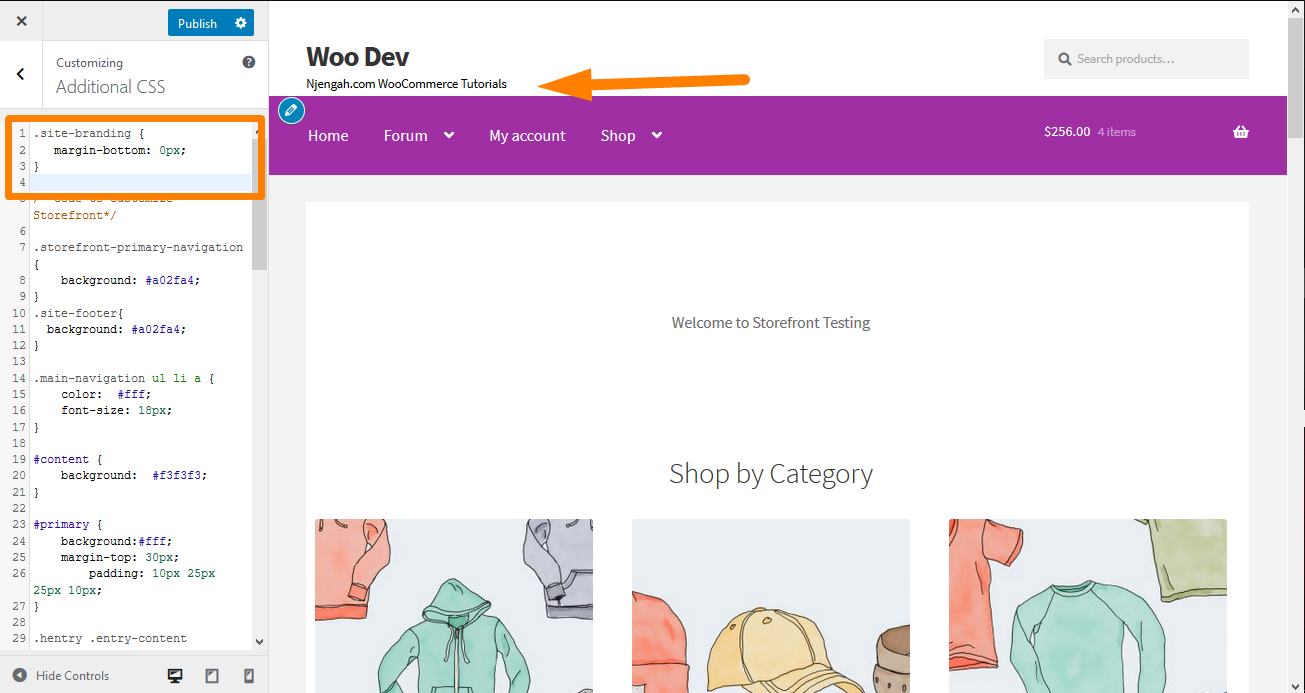
6. Increment the Width of the Search Bar
What would you do if you desire to extend the width of the search bar? Using the Additional CSS section, add together the following lines:
.woocommerce-active .site-header .site-search { width: 44.739%; } #masthead .site-search .widget_product_search input[blazon="search"] { width: 700px !important; } Here is the result: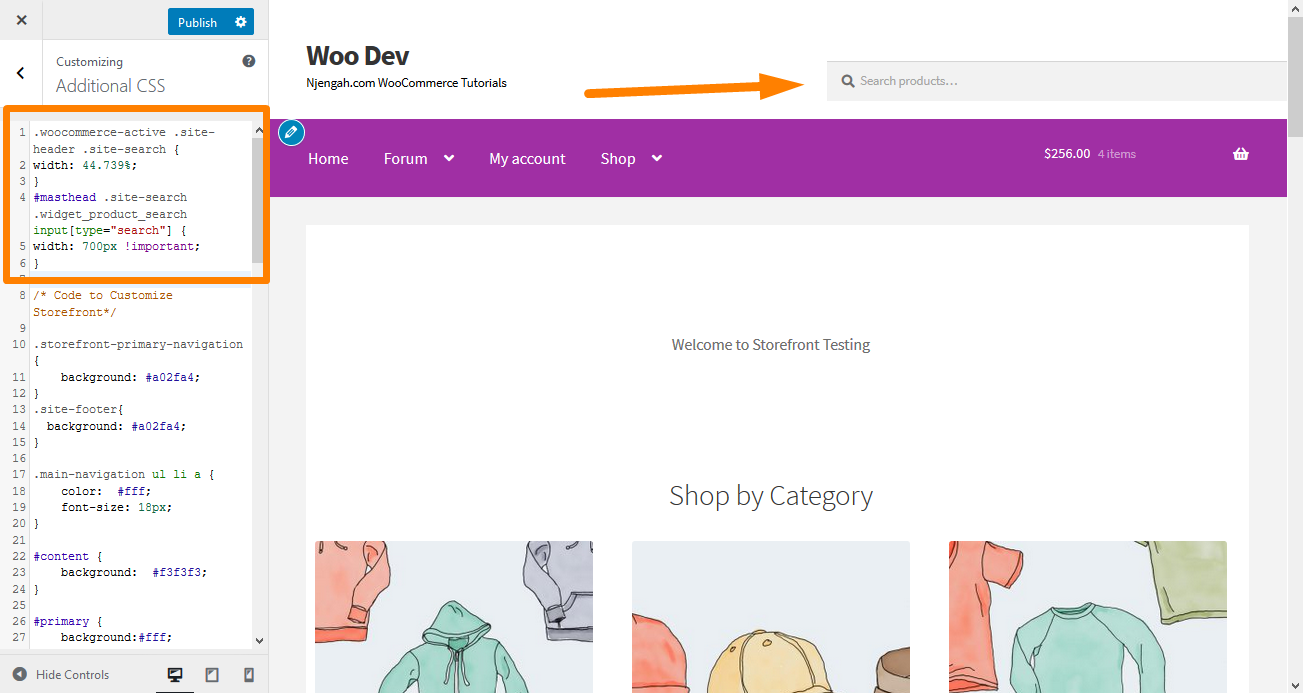
7. How to the Modify the Size of the Logo, Secondary Navigation, and Search Bar
To change them all at once, add together the following lawmaking to your Boosted CSS section:
@media screen and (min-width: 768px) { /* LOGO */ .site-header .site-branding, .site-header .site-logo-anchor, .site-header .site-logo-link { width: 30% !important; /* Use px values if y'all want, eg. 350px */ } /* SECONDARY NAVIGATION */ .site-header .secondary-navigation { width: 40% !of import; /* Use px values if you lot want, eg. 350px */ } /* SEARCH BAR */ .site-header .site-search { width: 30% !important; /* Utilise px values if you desire, eg. 350px */ } Here is the result:![]()
8. Remove Cart from Header
In this example, I volition remove the cart icon by calculation a new rule 'display: none;'. Add the post-obit CSS code in the Additional CSS section:
.site-header-cart .cart-contents { display: none; } Here is the issue: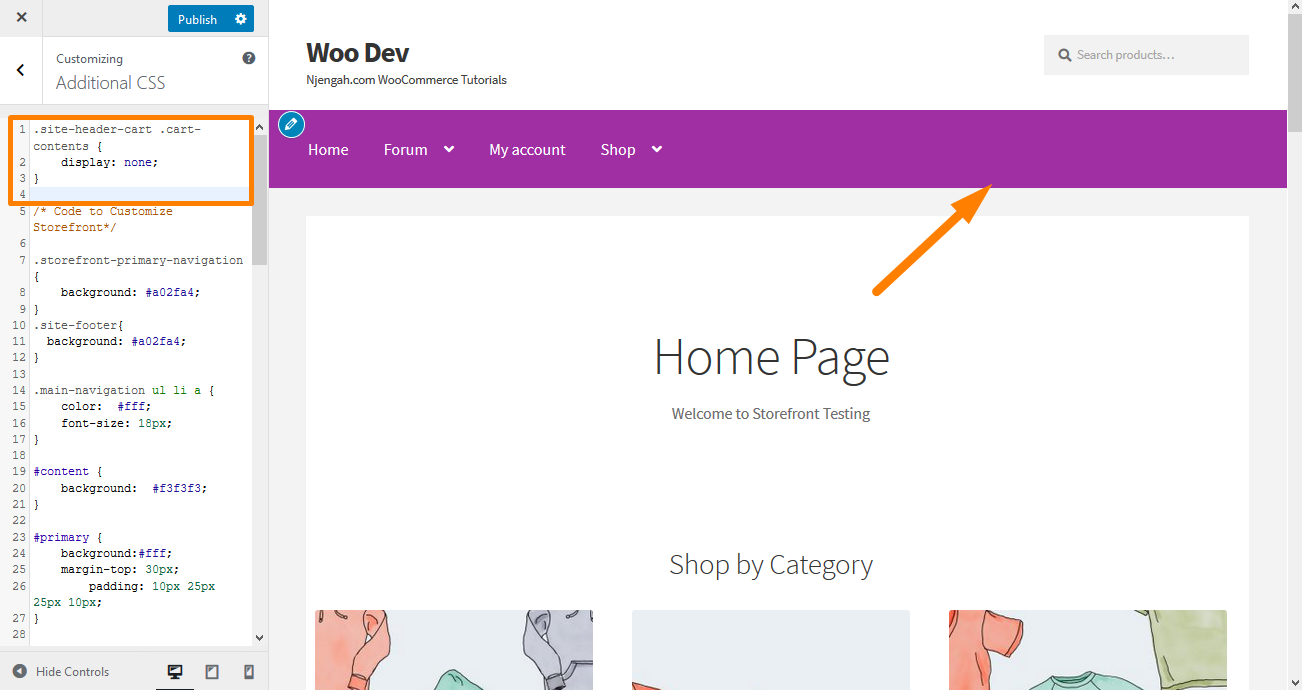
ix. Hide the Header
To hide the header, add the following CSS code in the Additional CSS section:
.site-header { display: none; } Here is the result: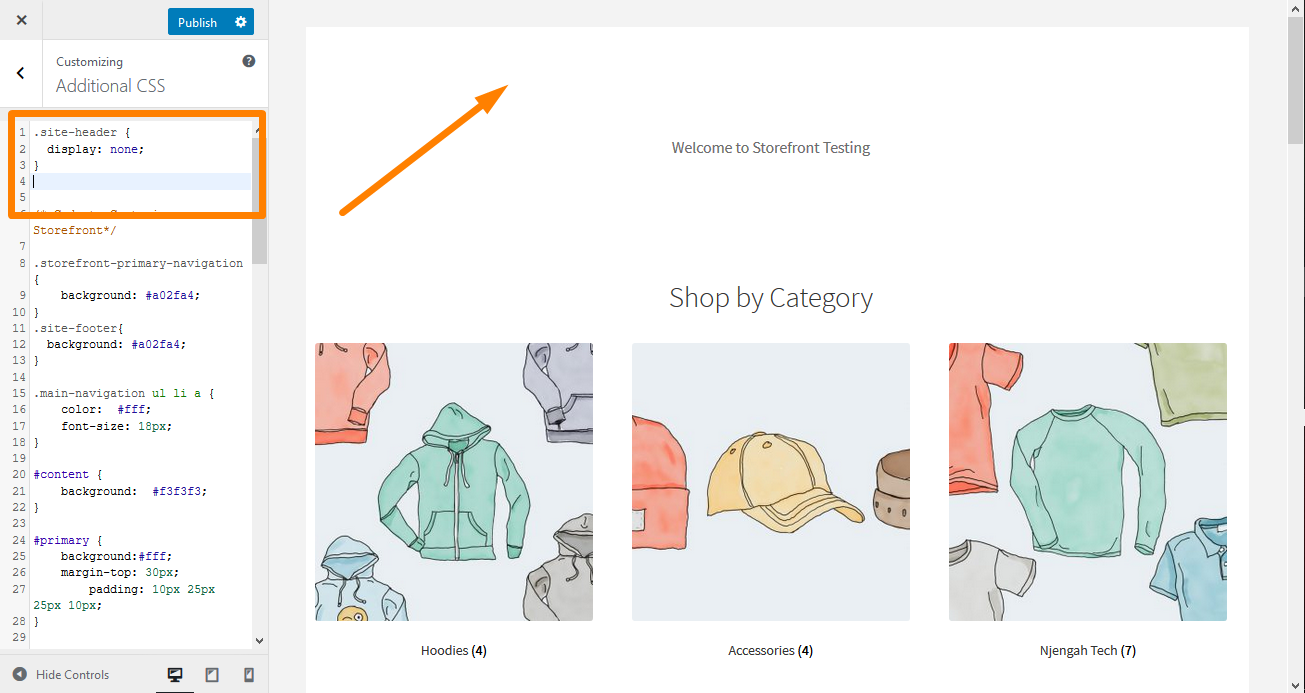
ten. Increase the Size of the Menu Link in the Storefront Header
Menus are slightly smaller, according to the preferences of many users. However, they demand to upgrade their font size of bill of fare links in the storefront theme. Add the following code in the Additional CSS department:
.main-navigation ul.menu > li > a, .main-navigation ul.nav-menu > li > a { font-size:28px; } Hither is the result:
11. Change the Size of the Cart Icon in the Storefront Header
You tin do this by adding the following CSS code in the Boosted CSS section
.site-header-cart .cart-contents { font-size:30px; } Here is the issue:![]()
12. Alter the Size of the Site Header Title in the Storefront Theme
Add together the post-obit Code in the Additional CSS section:
.site-header { font-size: 20px; } Here is the outcome:
13. Modify Size of Mobile Menu Button
It is important to note that the mode the menu is displayed is part of making the menu responsive. Therefore, if your main navigation card is in the class of a list on a desktop device, the same menu can be displayed as a hamburger card on a mobile device.
To change the size, add the following CSS lawmaking in the Additional CSS section:
.push button.carte du jour-toggle { font-size: 19px; } Hither is the event: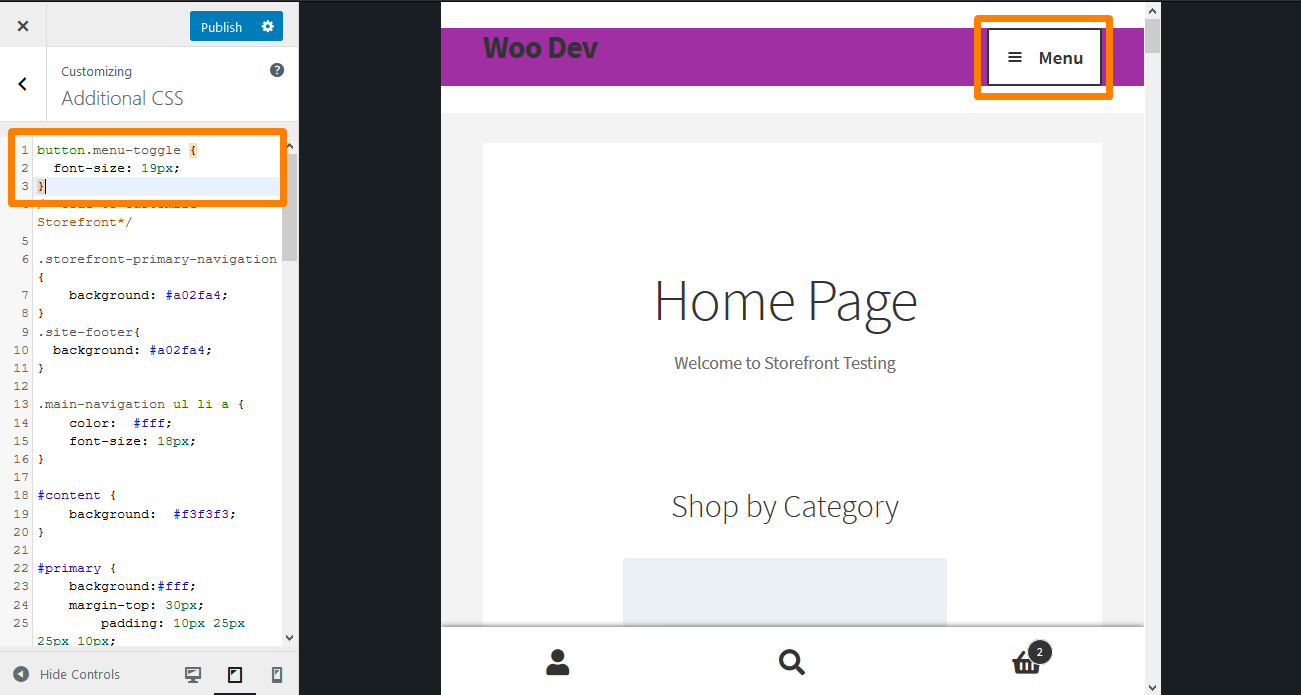
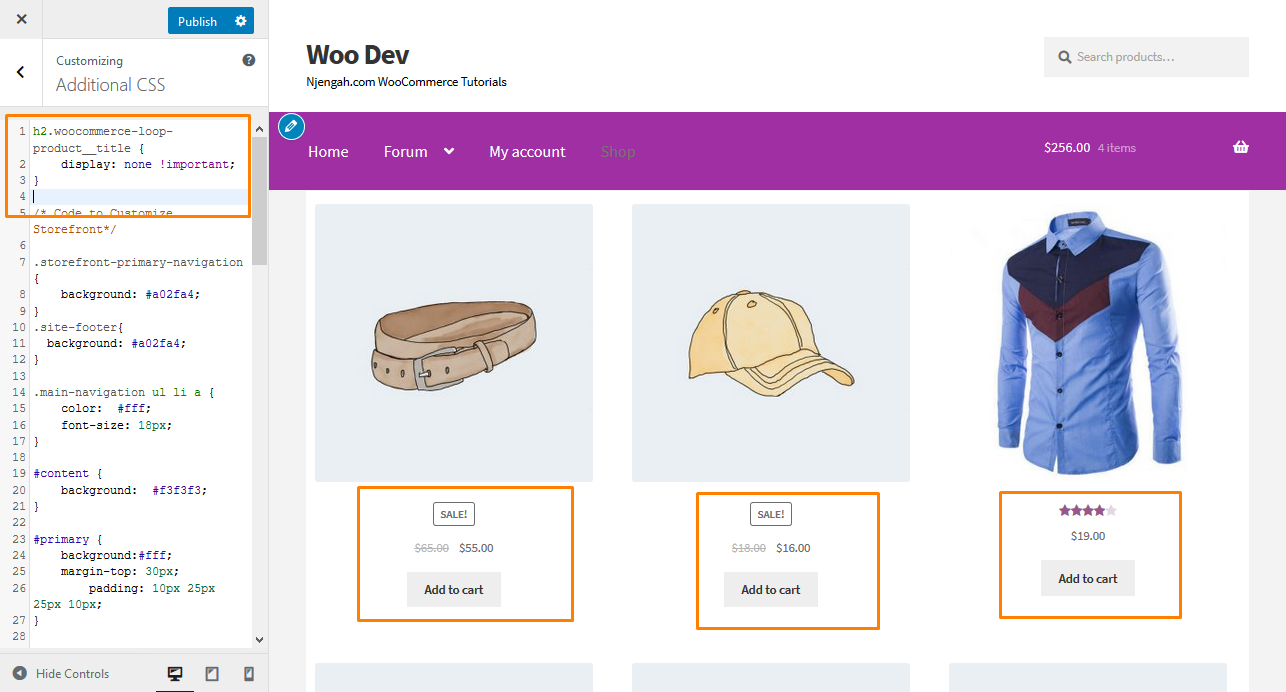
14. Hibernate Products Championship in the Shop Page
To hide the product'southward title in the shop page, simply navigate to Customize and then Additional CSS department and add together the post-obit lines:
h2.woocommerce-loop-product__title { display: none !important; } Here is the result:
xv. Hide the Production Quantity Plus and Minus Buttons from Product Page
For you to hide the text field with the plus and minus buttons to increase or subtract product quantity, all you lot demand to do is add the following CSS code in the Additional CSS section:
.quantity { display: none !of import; } Here is the event:
xvi. Hide "Add to cart" Push button on Product Page
To practise this, simply navigate to Customize then Additional CSS section, and add together the post-obit lines:
.single_add_to_cart_button { display: none !important; } Here is the result: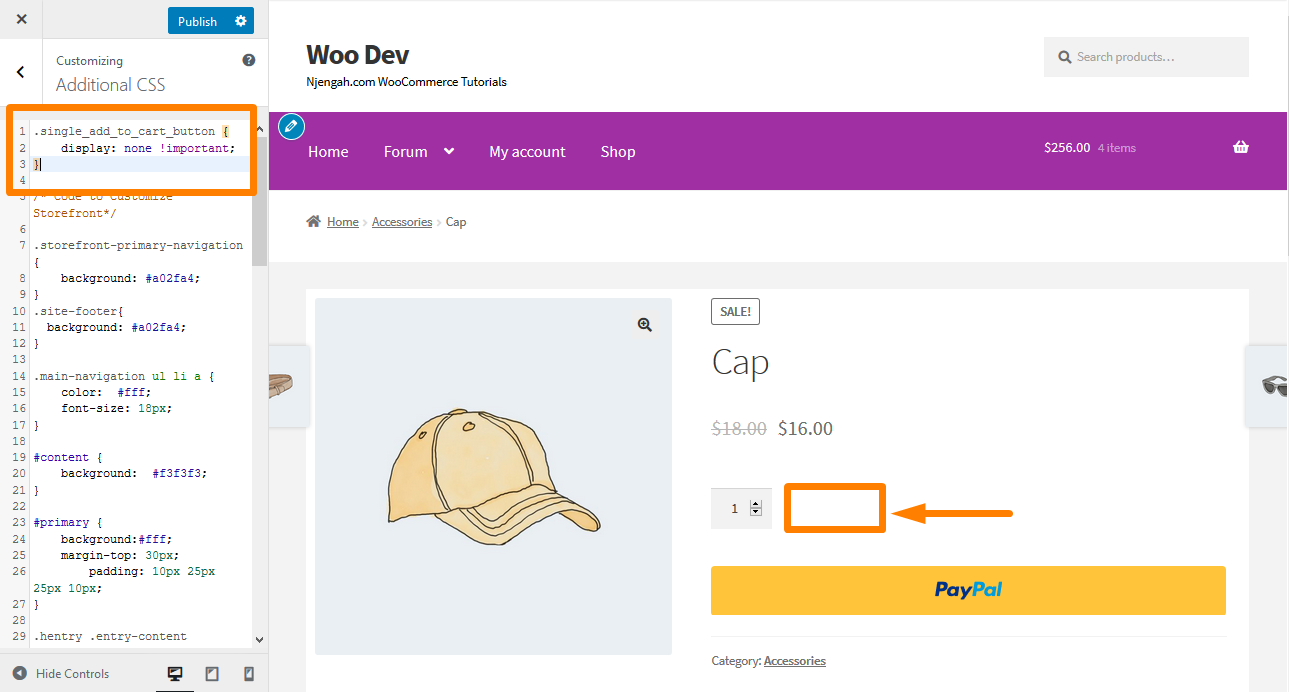
17. Modify Storefront Widget Section Color and Font Size
There is no straight fashion to change font color or size for the folio widgets using the customizer. Yous tin can easily modify this past calculation the following lines of CSS code. To practise this, navigate to Customize, so Additional CSS section, and add together the following lines:
.widget-area .widget { color: green; font-size: 1em; } Here is the result: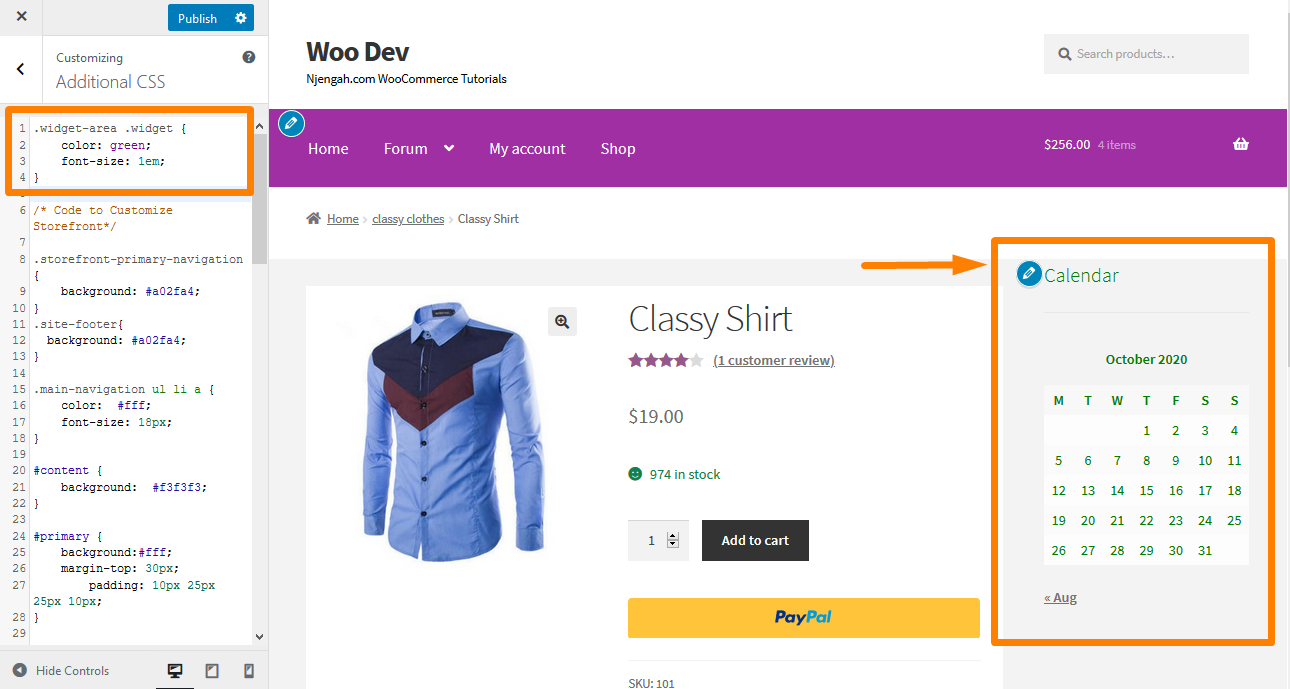
18. Bear witness Storefront "Sale" Badge on Product Image
The default version of the WooCommerce Storefront theme allows you to define a sale or a discounted price for a sure product. However, if y'all want to add the Sale bluecoat on the production epitome, navigate to Customize, then Boosted CSS section, and add the following lines:
ul.products li.product .onsale { position: absolute; pinnacle: 137px; correct: 62px; } Here is the issue:![]()
19. Alter the Color of the "Auction" badge
To change the color of the Auction bluecoat, simply navigate to Customize then Additional CSS section and add the following lines:
.onsale { background-color: blackness; border-color: red; color: red; } Here is the result:![]()
twenty. Alter Quantity "plus-minus" Box Color
This can be done by changing the background colour of the quantity plus and minus buttons. To exercise this, navigate to Customize, and then Additional CSS section, and add together the post-obit lines:
.quantity .qty { color: #000; background-color: #f5df72; } Here is the result: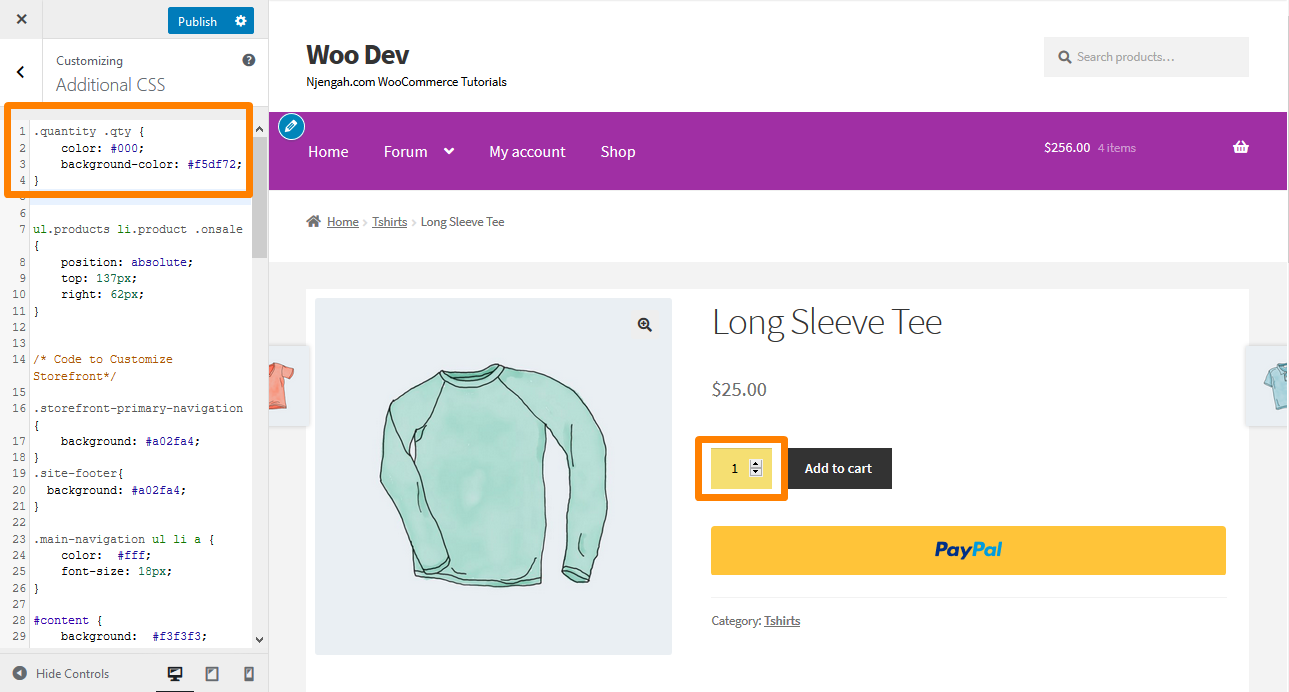
21. Change the Background Colour of the Minicart on the Header
When changing the color of the header, the mini cart dropdown inherits this color. However, you lot can change this by using the following CSS rules for added visibility. Navigate to Customize, then Boosted CSS section, and add the post-obit lines:
.woocommerce.widget_shopping_cart { groundwork: cerise; border-radius: 12px; } Here is the upshot: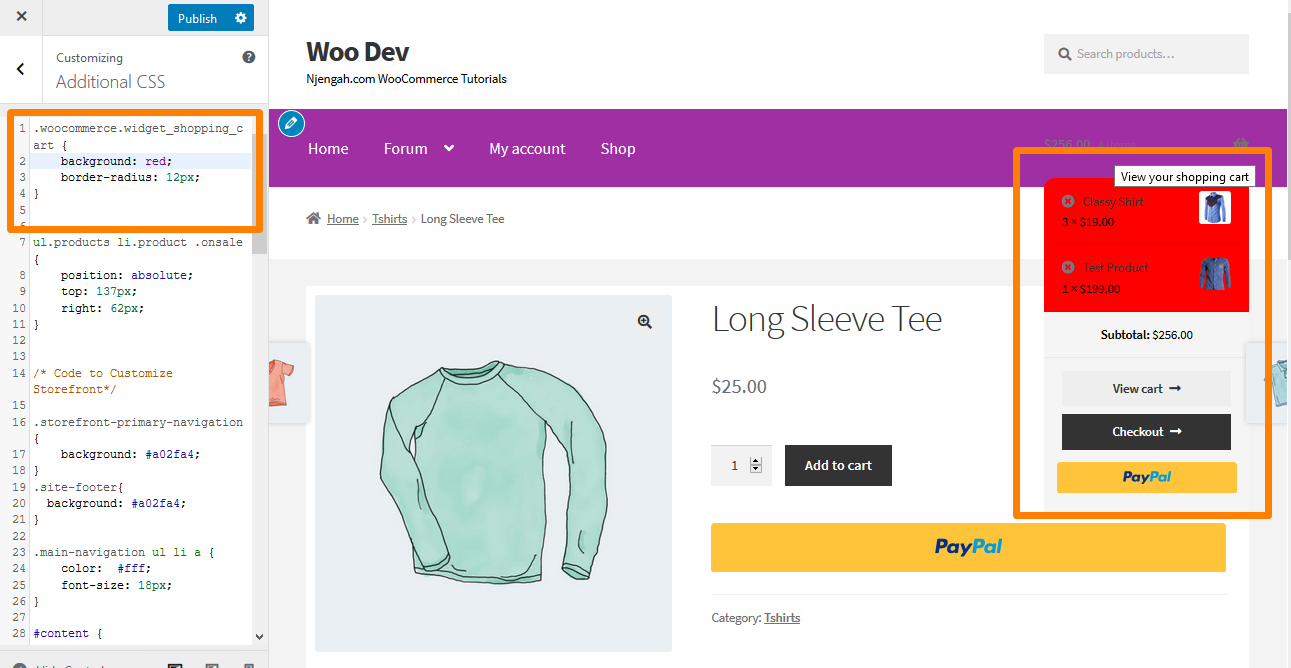
22. Add together Prototype in Storefront Footer Using CSS below Copyright
If you want to add your own logo, accustomed payments, or partner badge beneath the copyright text, navigate to Layers, Customize, and and so click on Footer.
Click on Customization to aggrandize the panel and click on Select Image in the groundwork.
Please select the image you desire and add information technology.
Select No Repeat and Lesser, or position information technology manually as desired.
Navigate back to the Customizer and click on CSS to aggrandize the panel. Nevertheless, you lot should ensure that the percentages are according to your specifications. Then add the post-obit lines:
.site-info:later on { content: ''; background-epitome: url(add your own URL); brandish: block; width: 100px; height: 100px; margin: 0 auto; } Here is the result: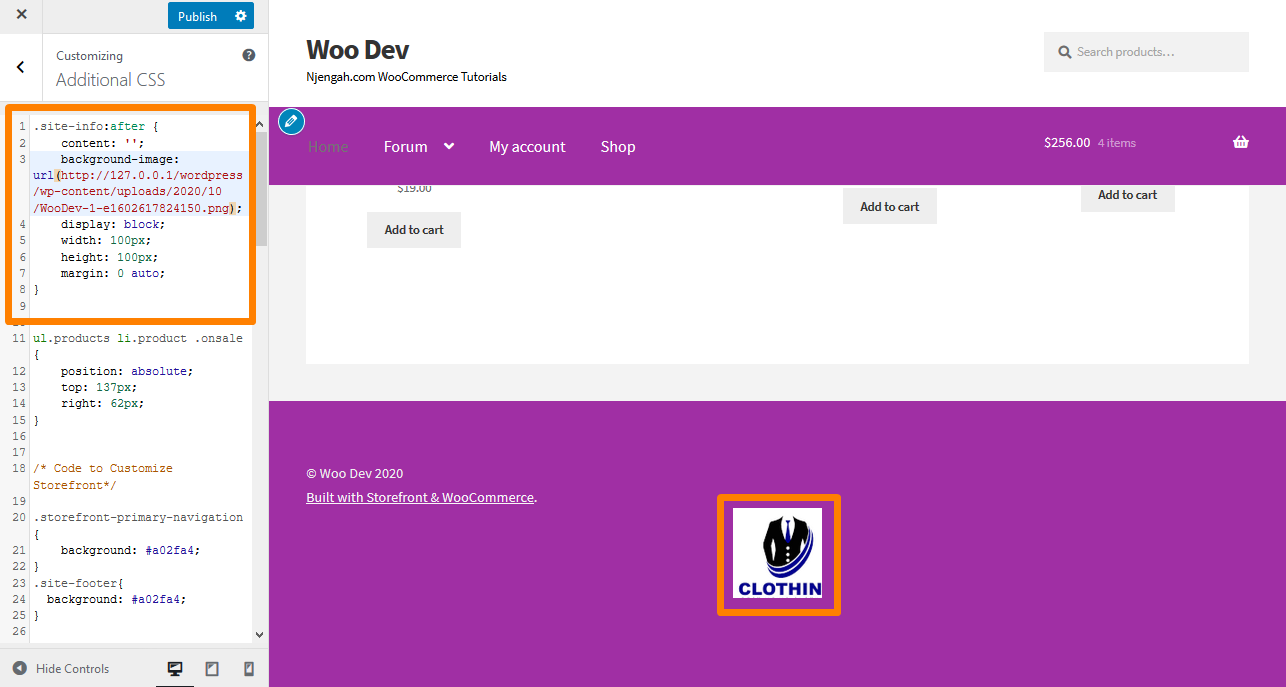
-
How to Remove Gap in Footer
Navigate to Customize, then Additional CSS department, and add the following line:
.footer-widgets { padding-top: 0; }
Here is the result: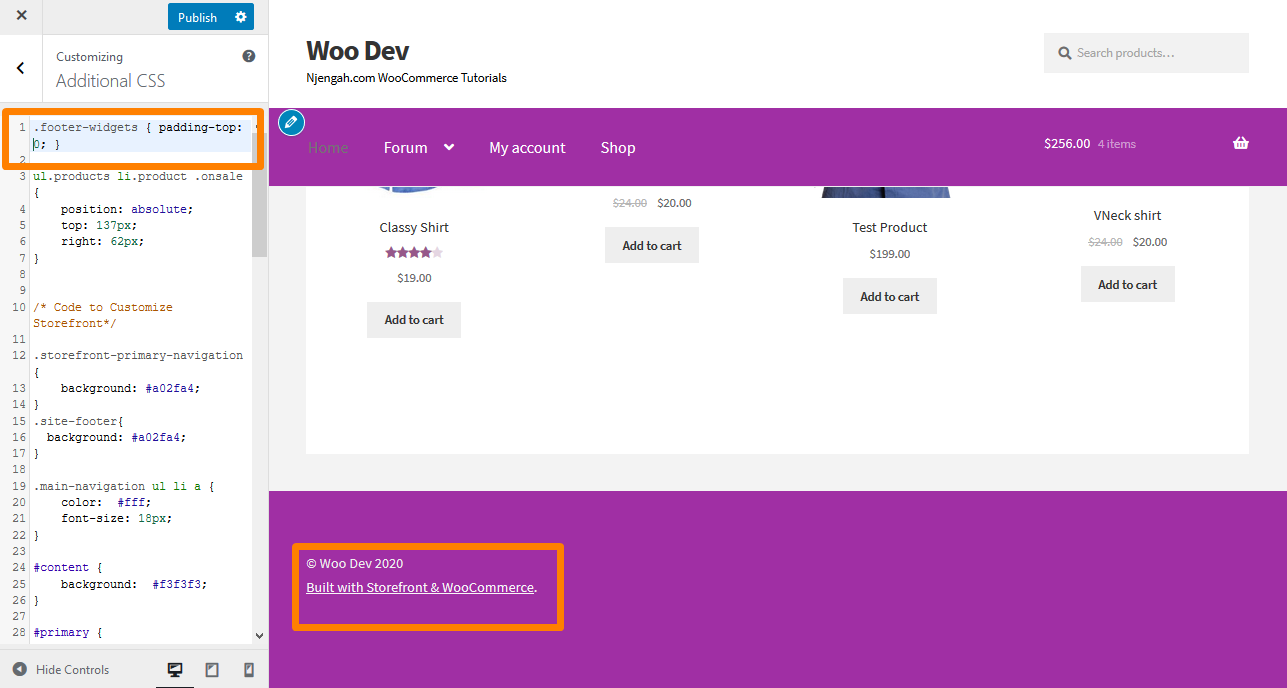
24. How to Remove the Underline from Hyperlinks
By default, the Storefront theme underlines links, and if you lot want to remove them, navigate to Customize, then Additional CSS section, and add together the following lines:
a { text-ornament: none !important; } Hither is the result: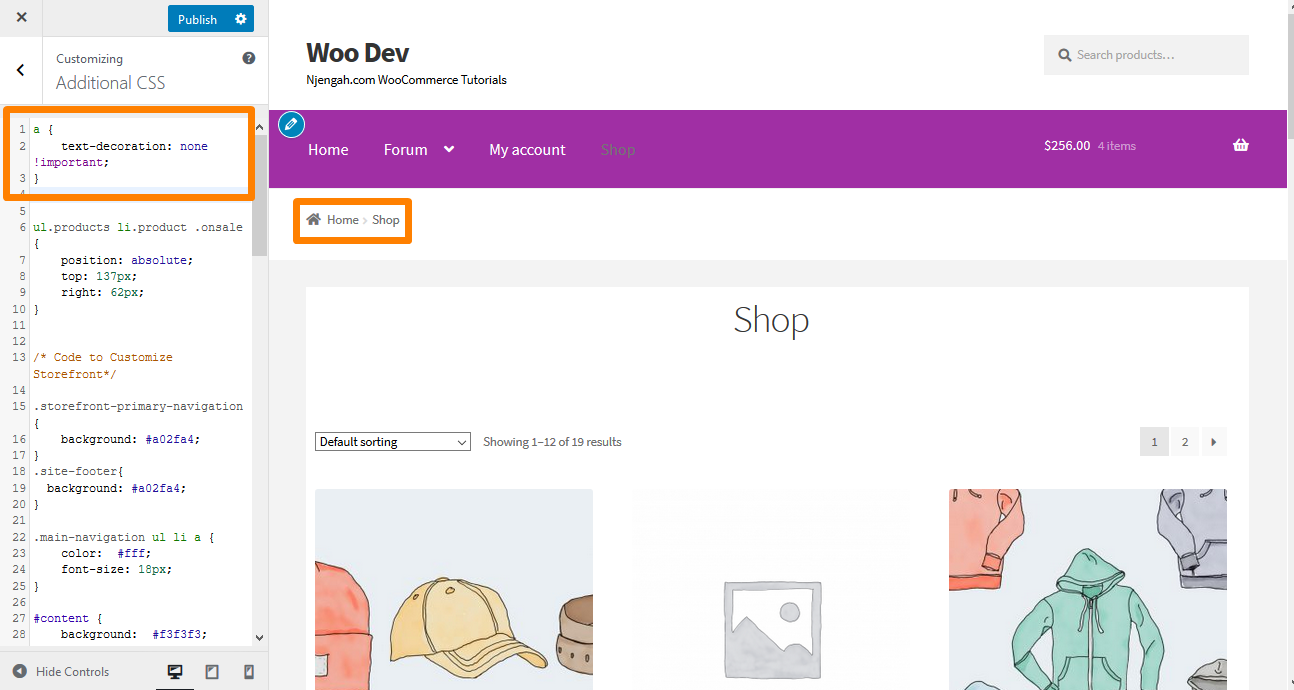
25. How to Change the Colour of the Horizontal Lines on the Storefront Homepage
Simply add together the following code to your child theme's custom.css file:
.page-template-template-homepage .hentry .entry-header, .page-template-template-homepage .hentry, .page-template-template-homepage .storefront-product-department { border-color: red; } 26. How to Customize the Storefront WooCommerce on Sale Bluecoat
Simply add together the post-obit code to your Additional CSS section:
.onsale { background-color: #FFFFFF; border-color: #FF0000; colour: #FF0000; } Here is the consequence:![]()
27. How to Change the WooCommerce Storefront Footer Pinnacle
Information technology is very like shooting fish in a barrel to change the WooCommerce Storefront footer height past adding the following CSS code in the Additional CSS department:
section.footer-widgets { padding-peak: 25px; } div.site-info { padding-top: 16px; padding-bottom: 25px; } Here is the issue:
28. Adding Background Image to Storefront a particular Homepage Section
The default Storefront theme has six sections namely, production categories, contempo products, featured products, popular products, on sale products and acknowledged products. Simply add the following code to the Boosted CSS section:
.storefront-featured-products{ background-image: url(Add your URL hither); groundwork-position: center centre; groundwork-echo: no-repeat; groundwork-size: cover; -o-groundwork-size: cover; } Here is the result: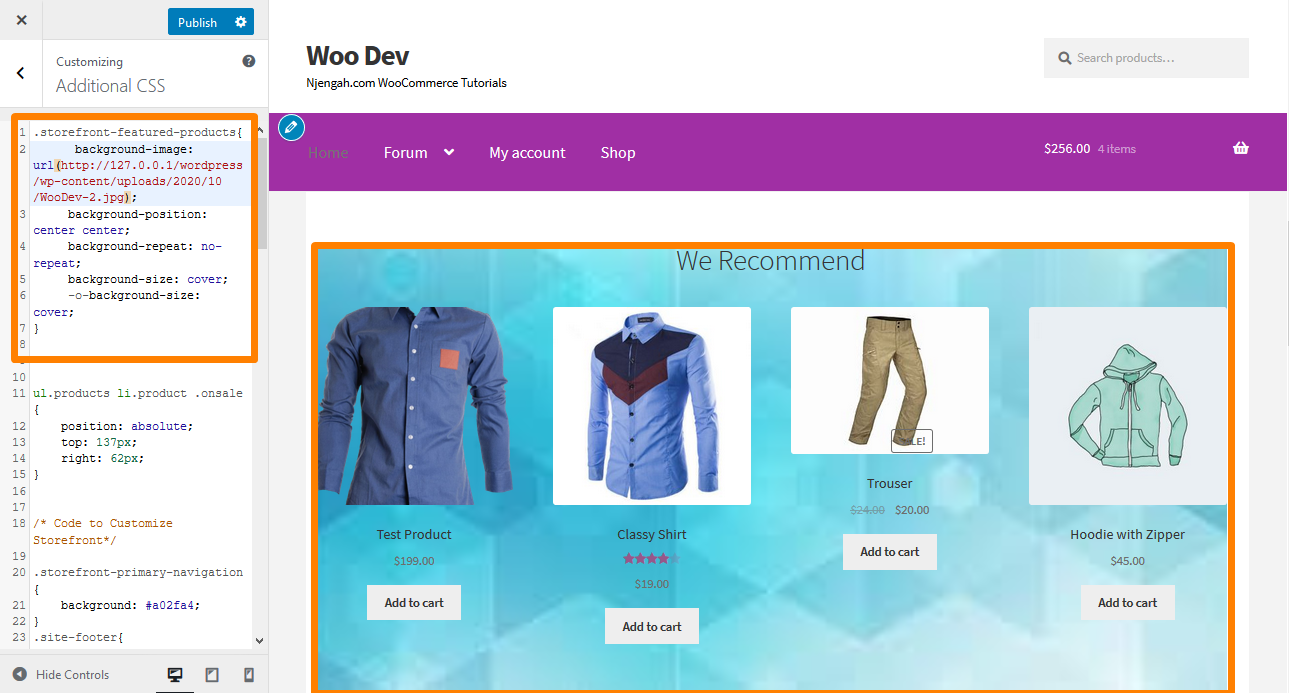
29. Adding Background Colour to Storefront Homepage Sections
To do this, you need first to place the section y'all desire to add colour. This can easily be done by adding the post-obit lawmaking to the Additional CSS department:
.storefront-featured-products{ groundwork-colour:#FFEB3B; } Here is the outcome: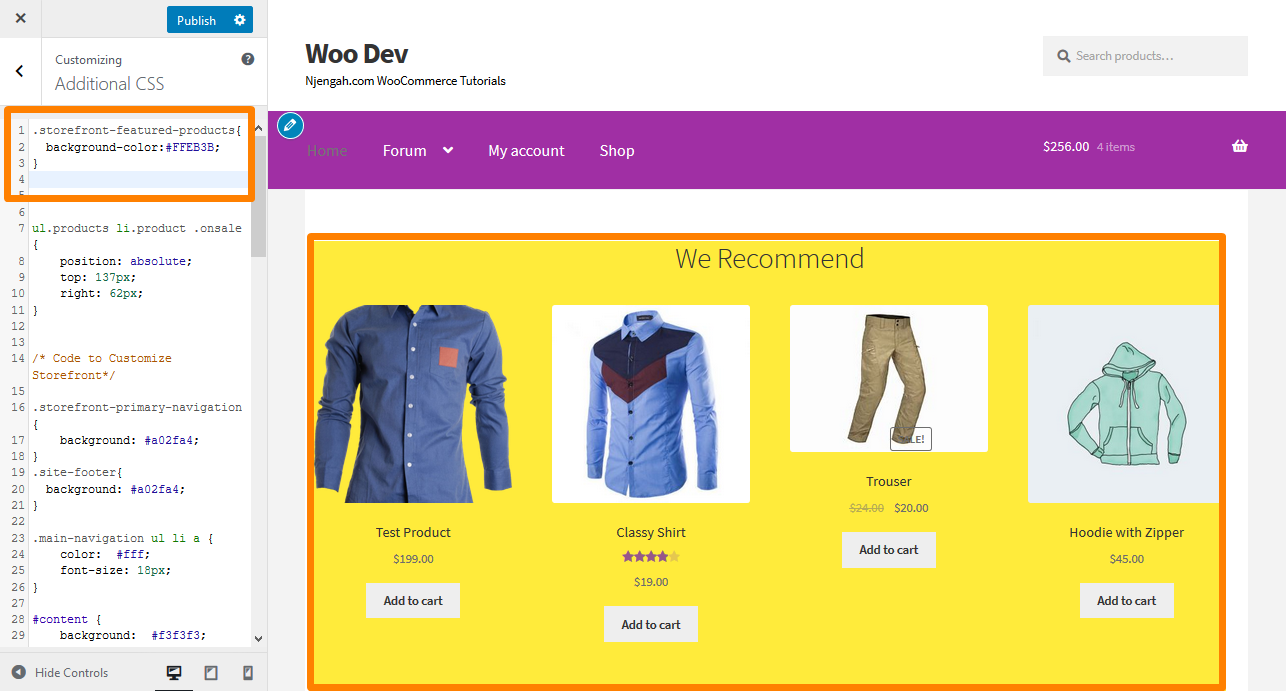
xxx. How to Remove or Hide the Homepage Section Championship
To do this you need to starting time place the section y'all want to remove or hibernate. This can be done by calculation the following lawmaking to the Additional CSS section:
.storefront-contempo-products .section-title {display:none;} .storefront-product-categories .section-title {brandish:none;} .storefront-featured-products .section-championship {brandish:none;} .storefront-popular-products .section-title {display:none;} .storefront-on-auction-products .section-title {display:none;} .storefront-acknowledged-products .section-title {display:none;} Hither is the result: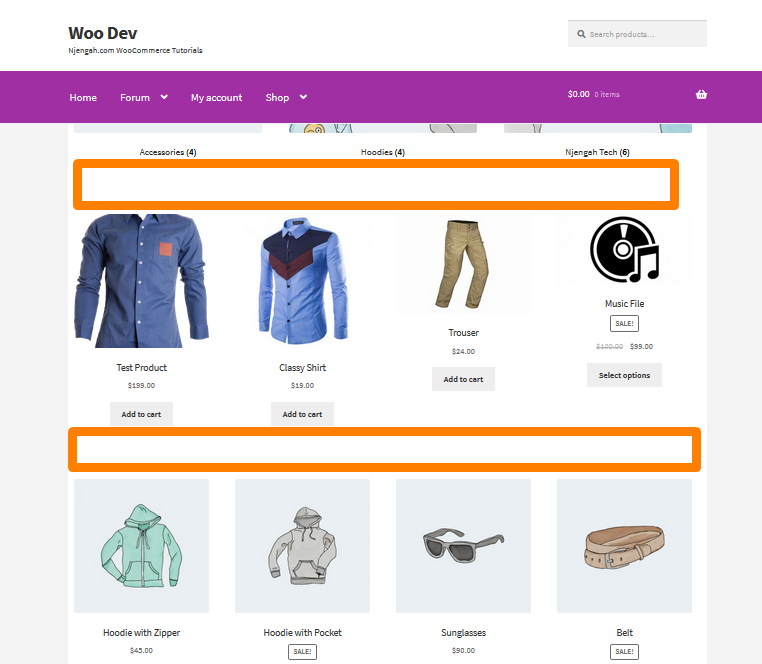
31. How to Modify Background Color of On Sale Products
This can be washed by adding the post-obit code to the Boosted CSS section:
.storefront-on-sale-products{ background-colour:#FFEB3B; } Here is the issue:
32. How to Automatically Add Space under Header for Pages without a Championship
Whenever you disable the main Page Title for whatsoever page, there is no space left under the header. This code snippet will assistance you add the spacing to insert a slider, image, or other content flushes with the summit. Add the post-obit code to the Boosted CSS department:
body.page-header-disabled #main { padding-top: 30px; } Here is the result: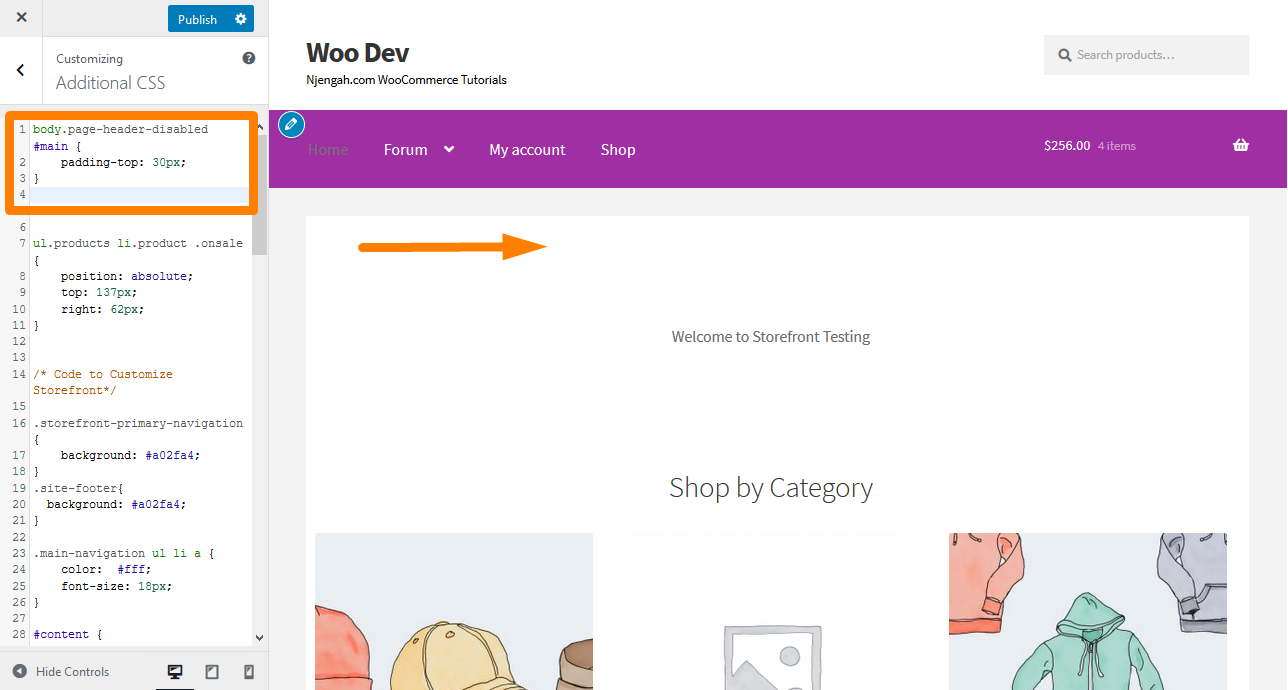
33. How to Hide Gyre to Height Button on Mobile
Simply add the following code to the Boosted CSS section: @media only screen and (max-width: 959px) { #site-roll-top { display: none !important; } } Here is the result: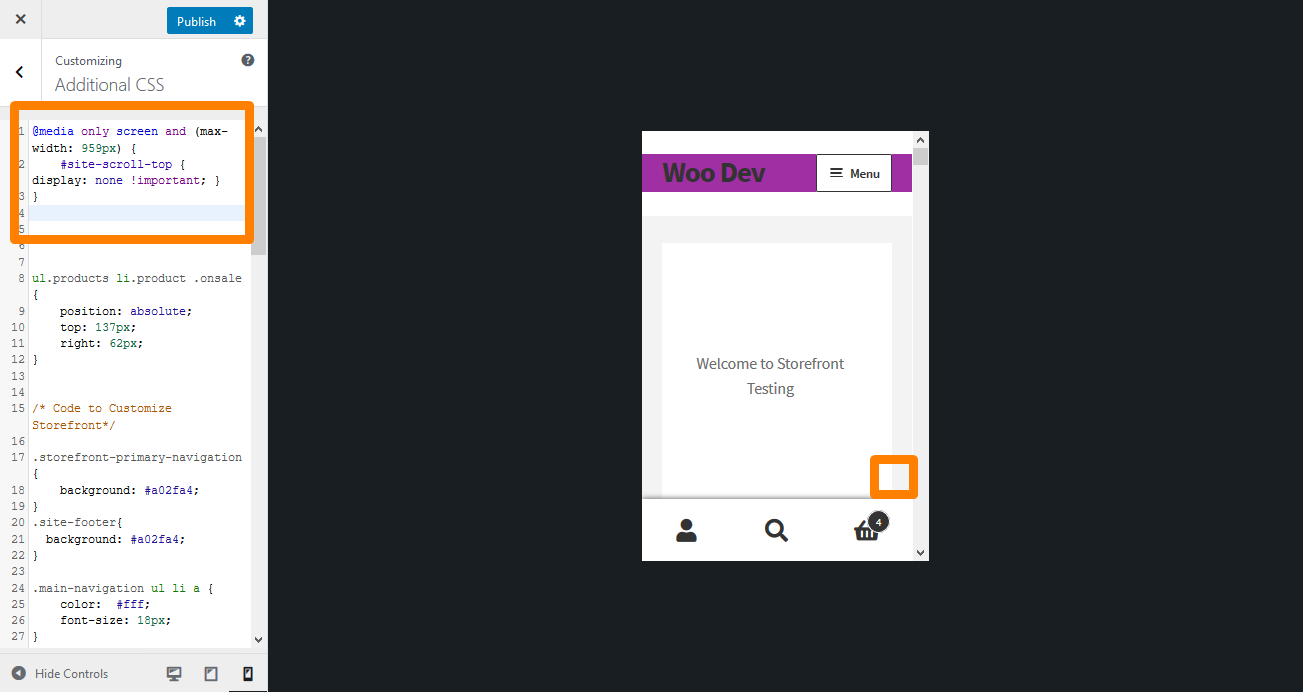
Conclusion
I have shared some CSS tips in this guide that y'all tin can use to style the Storefront theme. I highly recommend that you add the CSS rules in the Additional CSS section and so that you tin can preview the changes in real-fourth dimension. Previewing your changes will permit you to change the dominion to your specification.
To add together the rule, copy/paste into the "Additional CSS" section of your Storefront theme customization interface. To practise this:
- Log into your WordPress site and access the Dashboard equally the admin user.
- From the Dashboard menu, click on Appearance Bill of fare > Customize.
- Navigate down to Additional CSS in the left sidebar that appears.
- Add the CSS rule.
- If you are satisfied with the changes, click on Publish.
Withal, it is essential to annotation that the CSS tips shared hither only work for the Storefront theme.
Like Articles
- How to Accommodate WooCommerce Storefront Height of Header
- How to Ready Upward Homepage in WooCommerce Storefront
- How to Add Logout Option Bill of fare WooCommerce Storefront Theme [Example]
- How to Alter Storefront Theme Tagline WooCommerce
- How to Change Chief Menu Font Size Storefront Theme
- WooCommerce Storefront Header CSS Customization Guide
- WooCommerce Storefront Show all Categories on Homepage
- How to Change Size of Mobile Menu Button Storefront Theme
- How to Change Menu Color WooCommerce Storefront
- How to Change WooCommerce Storefront Footer Height
- How to Remove Footer Storefront Theme WooCommerce
- How to Change Size of Site Title WooCommerce Storefront Theme
- How to Remove Header WooCommerce Storefront Theme
- WooCommerce Storefront Theme Homepage Customization [Ultimate Guide]
- How to Change WooCommerce Storefront Featured Prototype Size
- How to Make Divi Mobile Menu Scrollable Quick Gear up Solution
- How to Hide Category WooCommerce Storefront Theme
- How to Alter Size of Cart Icon In WooCommerce Storefront Theme
- How to Remove Related Products WooCommerce Storefront Theme
- How to Hide Best Sellers WooCommerce Storefront Frontpage
Source: https://njengah.com/woocommerce-storefront-css/
Posted by: carrierfortint.blogspot.com
0 Response to "How To Change Font Color And Size For Seach Footer Widget"
Post a Comment